Key Takeaways
- Sharp edges let your board carve cleanly on firm snow.
- Regular edge tuning keeps your board responsive and safe.
- You need basic tools: a file, a guide, a gummy stone and sturdy vices.
- Detuning the nose and tail stops the board from catching unexpectedly.
Why sharpen your snowboard edges? Because smooth, sharp edges give you control and prevent unwanted slides. Dull edges can make carving difficult and increase the chance of a nasty fall.
By learning how do you sharpen snowboard edges and care your edges, you keep your board performing at its best. This guide explains when and how to tune, what tools you need, and why it pays to dull the nose and tail.
With a few simple steps, you can maintain your board at home and ride with confidence all season long.
Understood. I will write the second section of the article, focusing on why sharpening snowboard edges is necessary. I will present the reasons in bullet points with a brief explanation for each, making sure to follow the provided style guidelines and include relevant citations.
Why Sharpen Your Snowboard Edges?
- Better control on hard snow – Sharp edges bite into firm or icy slopes, letting your board carve cleanly and hold turns at speed. This grip reduces the chance of slipping out when the snow is hard-packed.
- Safer, more predictable turns – A dull edge can catch unexpectedly or slide without warning. Keeping your edges sharp leads to smooth, controlled turns and lets you ride confidently.
- Consistent board response – Sharp edges help your snowboard respond quickly to your movements. Adjusting the bevel angle also lets you fine‑tune how aggressive or forgiving the board feels underfoot.
- Protecting your investment – Edges wear down after contact with rails, rocks or repeated hard use. Regular tuning prevents excessive damage and keeps your board performing its best over the long term.
How Often to Sharpen Your Snowboard’s Edge?
How often you need to sharpen depends on how and where you ride. Freestyle riders who spend time on rails and boxes or splitboarders dealing with rocks and roots may need to tune more often. Riding on icy slopes calls for sharper edges to hold a turn. Below is a quick guide to the main factors.
| Factor | What It Means | Sharpening Advice |
|---|---|---|
| Riding frequency | Casual rider vs. daily rider | Tune every few days of riding if you’re on the snow a lot. Once a season is enough for occasional use. |
| Terrain & snow | Icy slopes, firm groomers, rails, boxes | Keep edges sharp for ice; slightly dull them for park sessions, then sharpen again before returning to firm runs. |
| Edge wear or damage | Burrs from rocks or hard objects | Sharpen right after hitting stones or feeling a burr to prevent further wear. |
| Board feel | Loss of grip or sluggish turns | If the board feels less responsive, inspect and re-tune the edges. |
For riders who like a more aggressive grip, experimenting with sharper angles such as 87° or 86° may require more frequent tuning. Use the thumb test to check sharpness: if the edge feels blunt or burred, it’s time to tune.
Understood. I will write a clear and concise “Understanding Your Edges” section that introduces the anatomy of a snowboard edge and touches on bevel angles, anticipating an infographic. I’ll adhere to the provided style and include relevant citations.
Understanding Your Edges
Before you tune your board, it helps to know what you’re working with. A snowboard edge has two surfaces: the base edge runs along the underside of the board, and the sidewall edge runs along the side. These surfaces meet at a defined angle called the bevel.
Most boards leave the factory with an 89‑degree bevel that balances grip and forgiveness. The base edge usually has a slight bevel to stop the edge from catching, while the sidewall edge is tuned to hold turns. Adjusting these angles changes how the board behaves. Riders who want more bite on firm snow often set the bevel closer to 87°.
An infographic can help you see where the base and side edges meet and how different angles affect performance. Refer to it as you read the step‑by‑step guide so you know exactly which surface you’re filing and why.
Tools You Need
Sharpening snowboard edges doesn’t require a workshop full of gear. A few simple tools will let you tune your board at home.
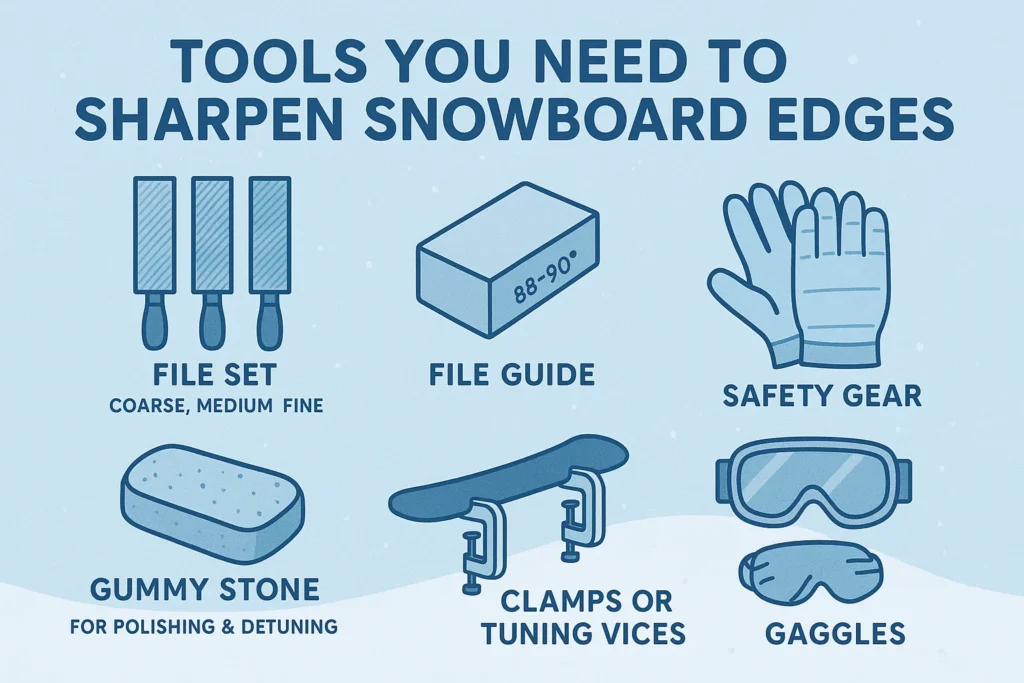
- File set – Use coarse, medium and fine files made for snowboard tuning. Diamond files last longer, while steel files cost less.
- File guide – This device holds your file at a consistent angle, usually between 88° and 90°, so each pass is even.
- Gummy stone – This smooth stone removes burrs and polishes the edge after filing. It’s also used to detune the nose and tail.
- Clamps or tuning vices – Secure the board to a workbench or table to keep it steady. Dedicated snowboard vices make the job easier and protect the base.
- Safety gear – Wear goggles and gloves to protect your eyes and hands from metal shavings.
Having a selection of files lets you match the tool to the condition of your edges. Always remove as little metal as needed to achieve a sharp edge.
Step‑by‑Step Sharpening
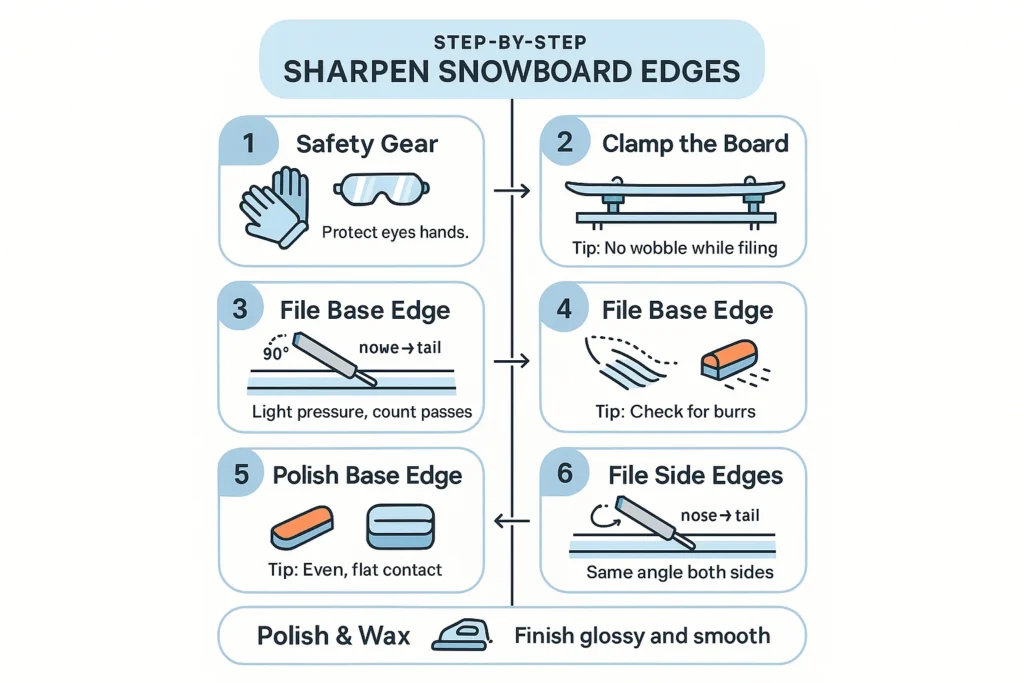
- Put on your safety gear – Gloves and eye protection keep metal shavings away from your skin and eyes. Tip: Choose snug gloves for a better grip on the file.
- Sharpen the base edges first – Place the file in the guide and align it with the base edge at the widest part of the nose. Use long, smooth strokes toward the tail with gentle, steady pressure. Counting your passes helps you match the sharpness on both edges. Tip: Mark the edge with a felt‑tip pen; when the ink disappears evenly, you’ve filed the edge uniformly.
- Clean the base edge – Wipe away metal shavings with a damp rag to prevent scratches and see if any burrs remain. Tip: Look for tiny raised spots; if you feel them with your finger, they need more attention.
- Polish the base edge – Starting at the nose, run a gummy stone flat against the base edge with light pressure. Repeat until the edge feels smooth and you no longer feel resistance. Tip: A polished edge reflects light evenly; dull areas mean you need another pass.
- Sharpen the sidewall edges – Repeat the filing process on the sidewall edges, using long strokes from nose to tail and keeping the file flat. The sidewall edge gives you grip during turns, so maintain the same angle and number of passes as on the base.
- Polish the sidewall edges – Clean up the sidewall edges with the gummy stone, using the same gentle, consistent passes. Tip: Hold the stone flat and move in one direction to avoid creating new burrs.
- Check and finish – Wipe both edges clean, inspect for any remaining burrs, and address them with your file or stone. Test the sharpness by lightly dragging your thumb across the edge; it should feel smooth but not dull. Finish with a hot wax to protect the base and restore glide.
Detuning the Nose and Tail
Freshly sharpened edges can catch unexpectedly on snow or ice. Detuning, or slightly dulling, the contact points at the nose and tail prevents this. You still keep sharp edges where you need them through the middle of the board.
- Prepare to detune – With the board clamped in place, hold a gummy stone or file at a right angle to the edge near the nose contact points.
- Round the nose contact points – Apply very gentle pressure and make a few passes over the contact points, rolling the file from the base toward the topsheet as you remove a small amount of material. Inspect after each stroke. Tip: You can always take off more, but you can’t put metal back.
- Round the tail contact points – Repeat the same process at the tail contact points.
Only detune the small sections at the ends of the board. Keep the middle edges sharp for good grip. The exact amount of detuning depends on your riding style; if you’re unsure, ask a shop for advice.
Understood. I will write the “When to Sharpen” section explaining suitable occasions for sharpening, followed by a subsection on situations when sharpening isn’t necessary. I’ll maintain clarity and conciseness while incorporating relevant citations.
When to and When Not to Sharpen Your Snowboard’s Edge?
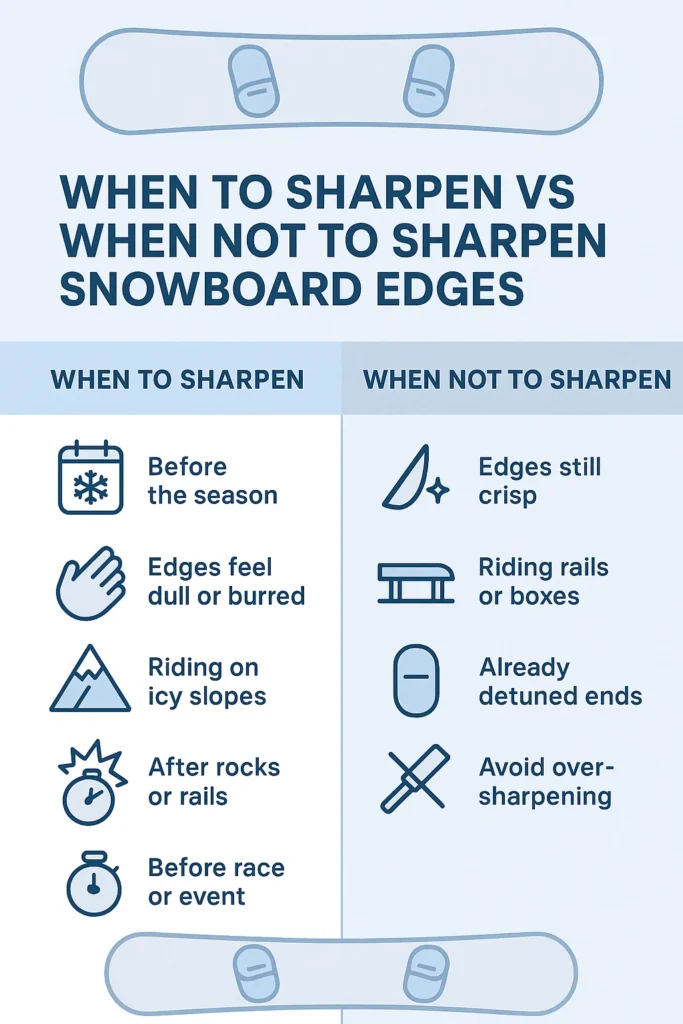
A well‑timed tune makes riding smoother and safer. Sharpen your edges:
- Before the season – Check and sharpen after your board has been stored, especially if the edges have rust from summer.
- When they feel dull – If the edge feels blunt or burred under your thumb, it’s time to tune.
- After intensive riding – Long days on hard snow, rocks or roots can rough up your edges. Sharpen to restore grip.
- For icy conditions – Fresh, sharp edges are essential when you expect ice on the slopes.
- After rail or rock hits – Sliding rails, boxes or hitting stones can damage edges; a tune fixes the burrs and brings back performance.
- Before a race or photo shoot – Clean, polished edges give you maximum control and confidence.
When Not to Sharpen?
- Edges are still crisp – Don’t file metal away if the board still holds turns well. Over‑sharpening shortens the life of your snowboard.
- Riding park or rails – If you plan to spend the day on rails or boxes, slightly dull edges can prevent snagging. Sharpen again when you return to groomed slopes.
- Nose and tail contact points – After detuning these areas, avoid sharpening them again; they should stay slightly rounded to reduce catching.
Listening to how your board feels underfoot helps you decide whether it’s time for a tune or a break from the file.
Understood. I will write the “Simple Technique for Home Sharpening” section that concisely describes an easy at-home method for sharpening snowboard edges. I’ll adhere to the style guidelines and include relevant citations.
Simple Technique for Home Sharpening
You don’t need a full workshop to keep your edges in shape. With a few tools and a steady hand, you can tune your board at home.
- Gather a file with a guide, a gummy stone, clamps or vices, and a clean cloth.
- Loosen or remove your bindings so they don’t get in the way.
- Clamp the snowboard firmly to a table or workbench.
- Place the file in the guide and run it along the base edge from nose to tail using light, even strokes. Keep the file flat and work in the same direction each time. A 90‑degree setting suits most riders; sharper angles give more bite for advanced use.
- Repeat the process on the other side of the board.
- Use a gummy stone to smooth any burrs and polish the edges.
- Wipe away any metal shavings and feel along the edge; if it’s smooth but not dull, you’re done. Apply wax to protect the base and improve glide.
This simple routine keeps your board responsive without taking much time or equipment.
Frequently Asked Questions
How do I know when my edges need sharpening?
If the edge feels blunt or burred when you rub it with your thumb, it’s time to sharpen. A shop technician can check quickly if you’re not sure.
What angle should I use for my edges?
A 90‑degree edge suits beginners and intermediate riders. Sharper angles like 87–86° give more grip for advanced riders or icy conditions.
How often should I sharpen my edges?
Occasional riders can tune once a season. Ride more often or sharpen sooner if you hit rocks, rails, or feel the board losing grip.
Do I need special tools?
Yes. You’ll need a file with a guide, a gummy stone, vices or clamps, and safety gear. A dedicated edge sharpener is a worthwhile investment for regular riders.
Which edge should I sharpen first?
Start with the base edge, working from nose to tail with light, even strokes, then repeat on the sidewall edge.
Why should I detune the nose and tail?
Slightly dulling the contact points at the nose and tail reduces the chance of catching on snow or ice, giving a smoother ride.
Sharpening snowboard edges gives you greater control and a smoother ride. Dull edges can cause unexpected slips and take the fun out of a day on the hill. A simple at‑home tune with a file, guide and gummy stone keeps your board responsive. Tune your edges more often if you ride a lot or face icy slopes, and less often if your board still holds turns well. Detune the nose and tail to stop catching. Avoid over‑sharpening; it wastes metal and shortens your board’s life. With a little practice, you’ll master the technique and enjoy confident carving all season.
