Key Takeaways
- Your stance (Regular or Goofy) decides foot placement and balance.
- Binding width, angles, and setback affect control and riding style.
- Small adjustments—like straps, toe ramps, and forward lean—improve comfort.
- Mount bindings by hand, double-check screws, and tune only if needed.
How to set your bindings on a snowboard comes down to matching stance, width, and angles to your style. The short answer: choose your lead foot, adjust binding width to shoulder distance, set angles for your riding type, and hand-mount your bindings with the right hardware.
Getting bindings right is more than just attaching them to your board. It’s about creating comfort, balance, and control for every ride. This guide breaks down each step, from knowing your stance to final safety checks. By the end, you’ll know how to set bindings that fit your boots and match the way you want to ride.
Know Your Stance
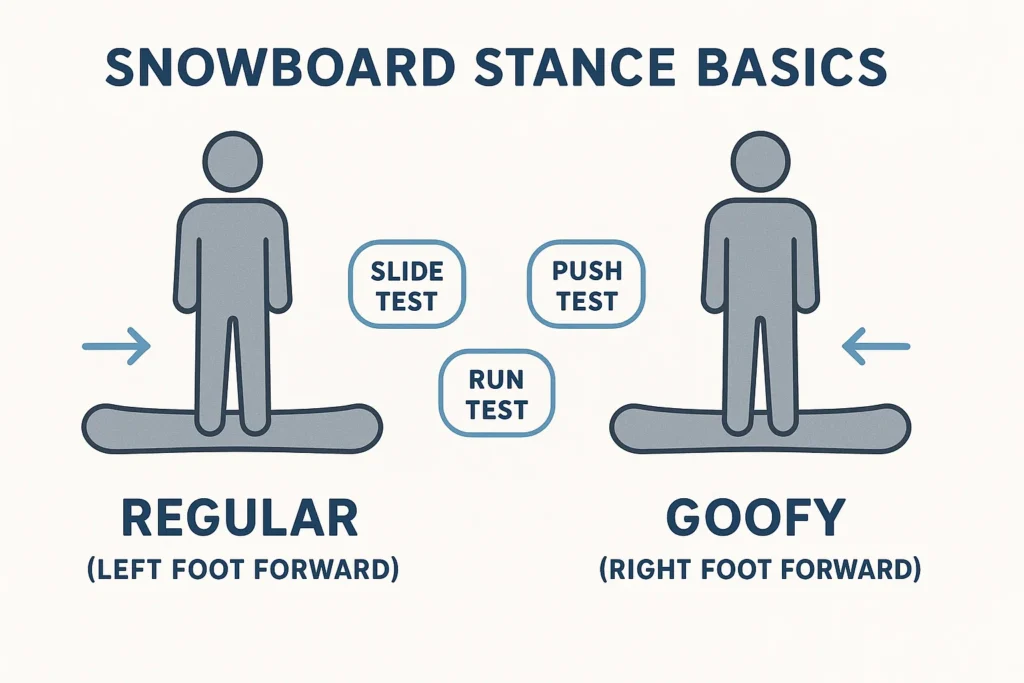
Your stance is the foundation of how you ride a snowboard. It decides which foot points forward and how your body balances on the board. Riders use two basic stances: Regular and Goofy.
- Regular stance: Left foot forward, right foot back.
- Goofy stance: Right foot forward, left foot back.
Most riders naturally feel comfortable with one stance over the other. Choosing the right stance matters because it affects your balance, turning ability, and overall comfort.
How to Find Out Your Stance?
You don’t need any gear to test your stance. Try one or more of these simple methods:
| Method | What to Do | Likely Result |
|---|---|---|
| Slide Test | Wear socks and slide across a smooth floor. | The foot you put forward is usually your front foot. |
| Push Test | Stand relaxed. Ask a friend to gently push you from behind. | The foot you step forward to catch yourself is your lead foot. |
| Run Test | Run a few steps and stop suddenly. | The foot you naturally place in front shows your stance. |
Why Stance Matters
- A correct stance helps you stay centered and balanced.
- It reduces strain on knees and hips while turning.
- It makes it easier to learn edge control and ride comfortably.
If you still feel unsure after testing, try both stances on snow. Many rental shops allow quick binding adjustments, so you can ride both ways and see which feels natural.
Find the Right Stance Width
The stance width is the distance between your bindings. Getting this right is key to balance, comfort, and control. A stance that is too wide or too narrow can make turning harder and put extra stress on your joints.
How to Measure Your Stance Width?
A simple way is to start with your shoulder width. Place your feet on the board about the same distance apart as your shoulders. This works well for most riders, especially beginners. Another method is hip width, which feels more natural for some body types.
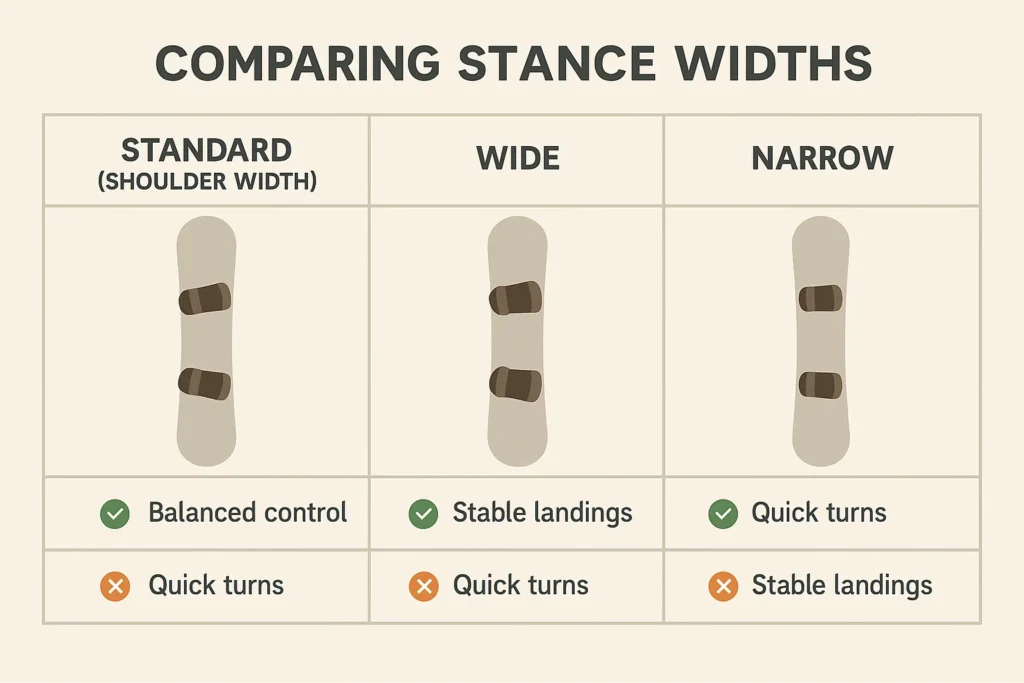
Wide vs Narrow Stance
Different widths create different riding experiences.
| Stance Width | Description | Pros | Cons | Best For |
|---|---|---|---|---|
| Standard (Shoulder Width) | About shoulder distance apart | Balanced comfort and control | Not specialized for tricks or speed | Beginners, all-mountain |
| Wide | Feet placed farther apart than shoulders | Stable landing, better balance for jumps | Less quick turning, harder on knees | Freestyle, park riders |
| Narrow | Feet closer than shoulders | Easier to initiate turns, agile | Less stability at high speed | Carving, technical riding |
Tips for Beginners
- Start with a shoulder-width stance. It’s the safest and most balanced setup.
- Adjust slightly wider or narrower once you gain experience and find your preferred riding style.
- Always check that both feet feel centered and that squatting in your stance feels stable.
A good stance width should let you drop into a squat with even weight on both feet. If you feel wobbly or off-balance, adjust until it feels natural.
Here’s the detailed expansion of Section 3: Check Setback Position:
Check Setback Position
The setback position is how far your bindings sit toward the tail of the snowboard. It changes how the board feels under your feet and how it rides in different conditions.
Centered Stance
When bindings are placed in the middle of the board, the stance is centered.
- Pros: Balanced for riding both directions, easy to learn on, predictable turns.
- Cons: Less float in deep snow.
- Best for: Beginners, park riders, and anyone riding mostly on groomed trails.
Setback Stance
When bindings are shifted toward the tail, the stance is setback.
- Pros: More weight toward the back helps the nose lift in powder. Easier control at high speed.
- Cons: Harder to ride switch (backward).
- Best for: Freeride riders, powder days, and directional snowboards.
How Much Setback?
Most freeride and powder boards already have setback built into their design. For all-mountain boards, a small shift of 1–2 cm toward the tail can make a big difference in float and stability.
| Stance Type | Binding Position | Best Use |
|---|---|---|
| Centered | Equal distance from nose and tail | Park, beginners, all-mountain |
| Setback | 1–2 cm or more toward the tail | Powder, freeride, carving |
Tip for Beginners
Start with a centered stance. Once you gain confidence and want to ride powder or freeride terrain, experiment with a small setback.
Decide Binding Angles
Binding angles control how your feet point on the snowboard. They affect comfort, knee alignment, and how easily you turn. Angles are measured in degrees, with the front binding pointing toward the nose and the back binding usually angled slightly outward or straight.
Typical Beginner Setup
A safe starting point is +15° on the front foot and 0° on the back foot. This keeps the front foot open for turning while the back foot stays neutral, making balance easier.
Common Binding Angle Setups
| Riding Style | Front Binding | Back Binding | Notes |
|---|---|---|---|
| Beginner | +15° | 0° | Easy to learn, balanced feel |
| Freestyle (Park/Jumps) | +15° | -15° | Duck stance, great for riding switch |
| Freeride (Powder/Speed) | +18° | -6° | More control at high speed, stable for carving |
| All-Mountain | +15° | -9° | Good mix of freestyle and freeride |
How to Choose Your Angles
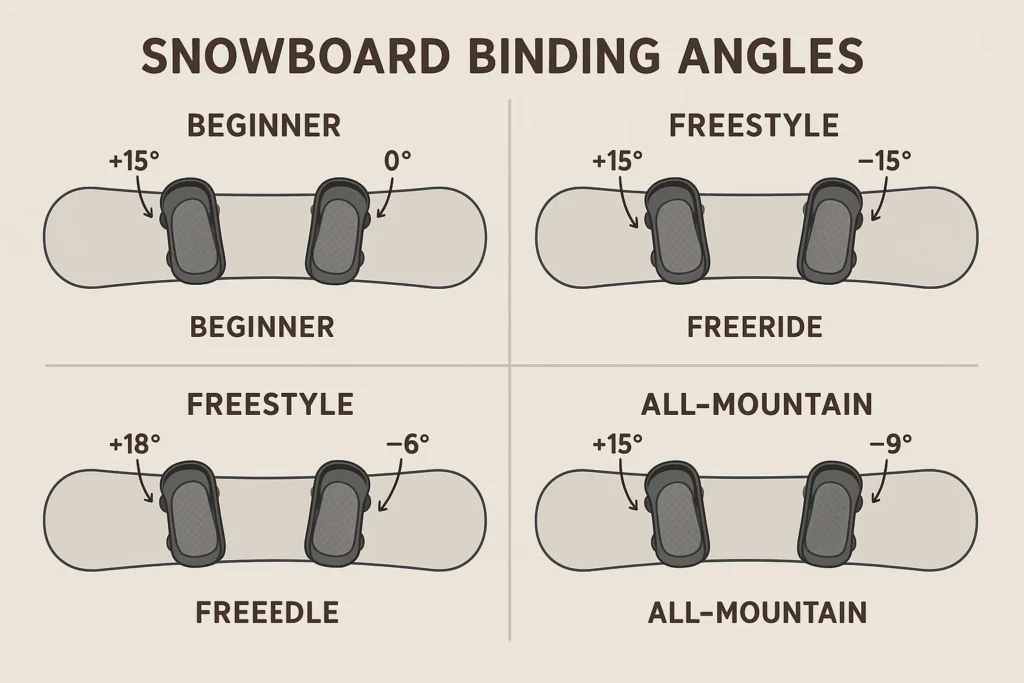
- Freestyle riders often use a duck stance (+15° / -15°) because it allows switch riding and smooth landings.
- Freeriders prefer more forward-facing stances (+18° / -6°) for precision and edge control.
- All-mountain riders usually ride with a slightly turned back foot, like +15° / -9°.
Testing on the Snow
After mounting, ride for a few runs and pay attention to knee comfort and turning response. Small adjustments of 2–3 degrees can make the setup feel much better.
Prepare Hardware and Tools
Before mounting your bindings, check that you have the correct hardware and a few simple tools. Using the right parts makes the setup secure and prevents damage to your board.
Mounting Systems
There are two main snowboard binding mounting systems.
| Mounting System | What You Need | Works Best With |
|---|---|---|
| Channel System | 4 M6 screws, 4 washers, 4 inserts | Burton boards with EST bindings |
| 4×2 Pattern | 8 M6 screws, 8 washers, and mounting discs | Most non-Burton boards |
- Channel System: Bindings slide along the channel for quick stance adjustments. Popular with Burton boards.
- 4×2 Pattern: Uses multiple holes on the board for stance options. Standard across most brands.
Tools You’ll Need
- Phillips screwdriver: Hand-tighten screws for a secure fit. Avoid power tools.
- Masking or painter’s tape: Mark binding positions before mounting.
- Your boots: Always check fit with the actual boots you’ll ride.
Quick Pre-Mount Checklist
- Do you have all screws, washers, and discs?
- Are bindings matched correctly (left and right)?
- Do the boots fit inside the bindings without strap issues?
Having everything ready saves time and prevents mistakes once you start mounting.
Adjust Before Mounting
Before you lock bindings onto your board, fine-tune them to fit your boots. Small adjustments now will save time on the mountain and make riding more comfortable.
Strap Adjustment
Straps should sit squarely across the middle of your boots.
- Place the boot inside the binding.
- Tighten the straps to check where they fall.
- If off-center, remove the strap screw and shift the strap forward or back.
- Re-tighten and test again.
Many bindings allow tool-less strap adjustments, but some require a screwdriver.
Toe Ramp and Footbed Adjustment
The toe ramp supports the front of your boot and prevents drag.
- Slide the toe ramp so the boot sole sits flat on the binding.
- Make sure neither toe nor heel hangs too far over the edge.
- Keep the ramp flush with the boot for strong toe-side turns.
Forward Lean Adjustment
The highback (the vertical piece behind your calf) can tilt forward.
- More forward lean gives sharper heel-side turns and faster response.
- Beginners should start with zero forward lean for comfort.
- Adjust later if you want quicker heel-side control.
Quick Tip
Do all these adjustments with your boots strapped in. That way you can see the exact fit and avoid surprises after mounting.
Mount Your Bindings
Once your stance, width, and angles are set, it’s time to mount the bindings. This step locks everything into place. Work slowly and check alignment as you go.
Step-by-Step Mounting
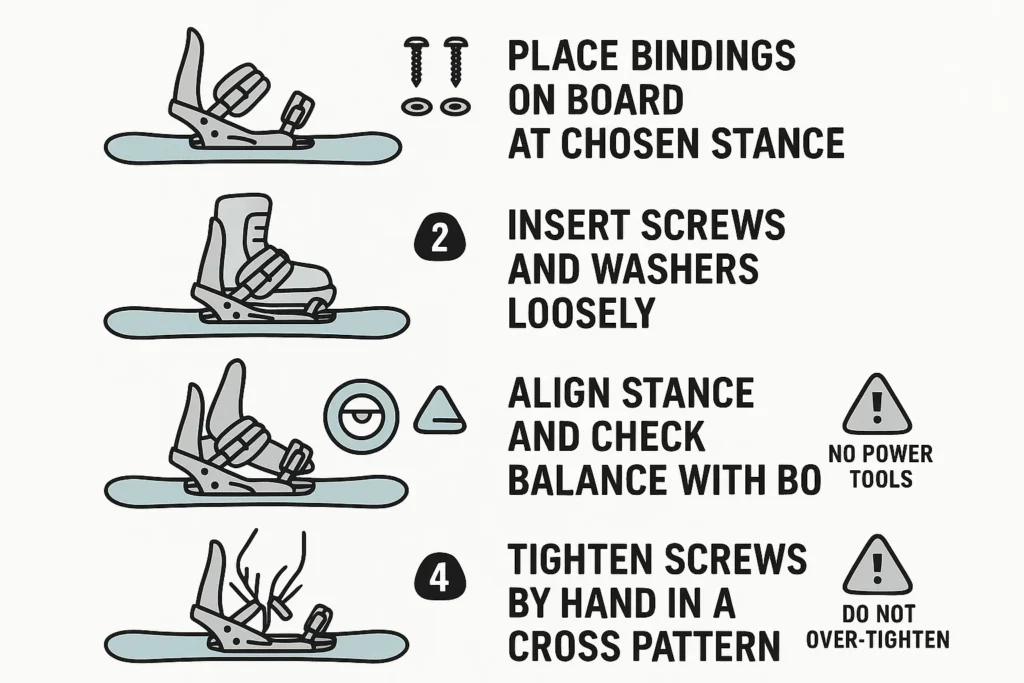
- Position the Bindings
- Place each binding on the board at the chosen stance width and angle.
- Align the holes in the baseplate with the insert holes (4×2 pattern) or slot them into the channel system.
- Insert the Screws
- Drop screws with washers into each hole.
- Turn each screw two to three times by hand with a Phillips screwdriver.
- Do not tighten fully yet.
- Check Alignment
- Strap in your boots and stand on the board.
- Make sure your stance feels balanced.
- Look for toe or heel drag—boots should not hang too far over the edges.
- Tighten Screws Evenly
- Once satisfied, tighten screws in a cross pattern (top-left, bottom-right, top-right, bottom-left).
- Keep pressure even so the binding sits flat on the board.
- Hand-tighten until snug. Do not over-tighten.
Important Notes
- Never use power tools: they strip screws and damage inserts.
- Avoid threadlock products: most contain chemicals that weaken plastics.
- Re-check after the first ride: screws may loosen slightly after initial use.
A solid mounting job ensures your bindings stay secure all day without shifting under pressure.
Final Checks with Boots
After mounting, strap in your boots to confirm the setup feels right. These checks ensure comfort and safety before you ride.
Strap Fit
- Put your boots in the bindings and tighten the straps.
- Straps should sit across the middle of the boot without pulling to one side.
- Adjust length if straps feel too tight or leave extra space.
Balance and Squat Test
- Stand on the board on a flat surface.
- Do a squat with knees bent deeply.
- You should feel centered, with even weight on both feet.
- If you tip forward or backward, adjust stance width or setback.
Toe and Heel Drag Check
- Look down at your boots from the top.
- The toe and heel should not stick far beyond the edges.
- A small overhang is normal, but too much causes drag and loss of control.
- If needed, adjust toe ramps or angles slightly.
Screw Tightness
- Check all screws one more time by hand.
- They should be snug but not over-tightened.
Tip for Beginners
Do these checks indoors before hitting the mountain. It’s easier to fine-tune in a warm room than on snow in gloves.
Tune if Needed
A new snowboard usually comes with a factory tune, which is fine for most beginners. Still, small tuning steps can improve performance depending on where you ride.
Waxing
Factory boards are often waxed with all-temperature wax. This works in many conditions, but:
- Cold, dry snow: A cold-temperature wax helps reduce drag.
- Warm, wet snow: A soft, warm-temperature wax prevents sticking.
- Regular riders: Re-wax every 3–5 days on the mountain for smooth glide.
Edge Detuning
Edges straight from the factory are very sharp. Beginners sometimes catch edges by accident, which can cause falls.
- Detuning means lightly dulling the metal edges at contact points (near the tip and tail).
- This reduces unexpected edge catches.
- Do it with a small file or diamond stone, and only at the contact points.
Pros of Tuning
- More glide on snow that matches wax temperature.
- Safer edge feel for new riders after light detuning.
- Custom fit for your riding style and conditions.
Cons of Tuning
- Tools and wax cost extra.
- Detuned edges can’t be sharpened back to factory sharpness.
- Beginners may not notice much difference from tuning at first.
Recommendation
If you’re just starting out, ride the board as it comes. Learn the basics first. Add tuning once you feel the need for more performance or smoother control.
Tips and Safety Checks
A good setup is not just about mounting bindings – it’s about keeping them safe and reliable every time you ride. These tips help avoid common problems on the mountain.
Recheck Screws Regularly
- Vibrations from riding can loosen screws.
- Before each day on the mountain, press a screwdriver on all screws.
- A quick check prevents bindings from shifting mid-ride.
Practice Adjustments in Gloves
- On the mountain, you’ll be wearing gloves or mittens.
- Try adjusting straps, toe ramps, and highbacks at home while wearing gloves.
- This practice saves time when you need fast fixes in cold conditions.
Use a Stomp Pad
- Beginners often struggle with balance when getting off the chairlift.
- A stomp pad placed near the rear binding gives grip for your free foot.
- It also helps when skating across flat areas.
Ride and Re-adjust
- Even after a careful setup, you may want changes after a few runs.
- Small tweaks in angles or strap tightness can make riding smoother.
- Don’t be afraid to adjust until it feels natural.
Store Tools in Your Bag
- Carry a small snowboard tool or screwdriver.
- Resorts usually have tool stations, but having your own makes quick fixes easier.
A little attention before and during the season keeps your bindings reliable, secure, and ready for every ride.
Frequently Asked Questions (FAQ)
Q1: How do I know if I’m Regular or Goofy?
Stand naturally and have someone give you a gentle push from behind. The foot you step forward with is usually your lead foot. If it’s your left, you’re Regular. If it’s your right, you’re Goofy. You can also try sliding across a smooth floor in socks—the leading foot is your front foot.
Q2: What stance width works best for beginners?
Start with your feet about shoulder-width apart. This gives balanced control without straining your knees. Once you get comfortable, you can experiment with a wider stance for jumps or a narrower one for carving.
Q3: What binding angles should a beginner start with?
A front binding angle of +15° and a back binding of 0° is a reliable starting point. It keeps your body aligned, helps with balance, and makes turning easier. As you gain experience, you can try duck stance (+15° / -15°) for freestyle or +18° / -6° for freeride.
Q4: How far should bindings be from the nose and tail?
For most boards and beginners, keep bindings centered. This balances weight between both feet and makes the board ride evenly. For freeride or powder boards, move bindings 1–2 cm toward the tail to help the nose float.
Q5: Can I return a snowboard after mounting bindings?
Usually not. Most shops won’t accept returns once bindings leave marks on the topsheet. If you think you might return the board, test your stance with tape first and mount bindings only when you’re sure.
How to set your bindings on a snowboard is about more than attaching hardware, it’s about creating a setup that matches your body and riding style. Start by finding your stance, setting the right width, and choosing angles that feel natural. Take time to adjust straps, toe ramps, and highbacks before tightening everything in place. Do a final check with your boots, and ride a few runs to test comfort. Small tweaks often make the biggest difference. With a secure setup, you’ll have better balance, smoother turns, and fewer falls. Once bindings feel right, snowboarding becomes more fun and much safer.


