
Last updated on September 5th, 2025 at 02:20 pm
Key Takeaways
- Not all snowboard boots can be heat molded; check your liner type.
- Heat molding takes about 10 – 20 minutes and involves heating and standing.
- Professional fitters use a specialized oven to heat the entire boot and mold it.
- You can reheat and reform liners if the fit isn’t right.
How to heat mold snowboard boots? It’s simpler than you think. At home you fill long socks with rice, warm them, and let the heat shape the liners. At a shop, a fitter heats the entire boot in a specialized oven and molds it directly to your foot.
Always check if your liners are heat‑moldable. Heating non‑moldable liners will ruin them. The process takes only about ten to twenty minutes, and you can reheat and reform the liners if the fit isn’t right.
In this article, we will show you how to heat mold snowboard boots step-by-step. Read further.
Before Heat Molding: Check Your Equipment
Before you start, verify that your snowboard boot liners are heat‑moldable. Heating non‑moldable liners will ruin the foam and shorten the boot’s life. Make sure you gather your materials before you begin heating your boots.
You will need
- Uncooked rice
- Two long thin tube socks, and
- A pair of old socks to cut.
Also bring thin snowboard socks and a short 2×4 board to stand on.
Remove the footbeds from your boots before heating the liners.
Check that your microwave is clean and large enough to heat the rice evenly. Have a safe work area with enough space to lay out your boots and tools.
How to Heat Mold Snowboard Boots? Home Method
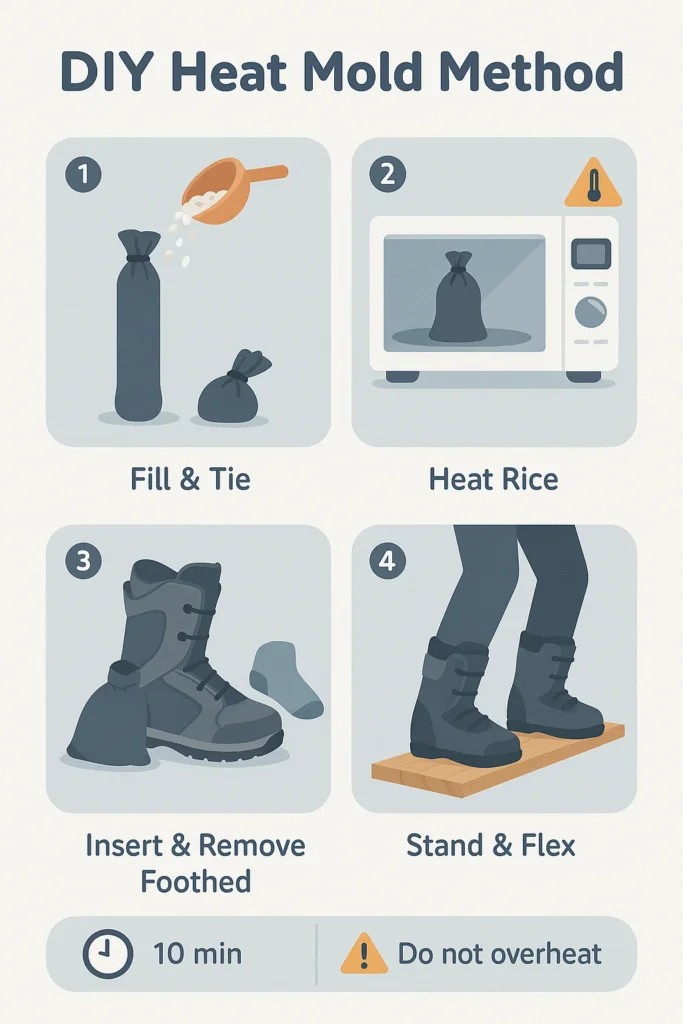
- Fill two long tube socks with three to four pounds of uncooked rice. Tie the ends securely and spread the rice evenly so it heats uniformly.
- Place the rice‑filled socks in the microwave and warm them until they are uniformly hot. Follow any manufacturer instructions for microwave heating times to avoid overheating the rice.
- Remove the footbeds from your boots and loosen the laces. Insert the heated sock into the liner and tap the heel and toe until the rice fills the foot. Place the second rice sock over the cuff and lightly tighten the boot to keep the liner even.
- Leave the rice socks in the liners for about ten minutes so the foam warms up evenly. While you wait, cut the toes off a pair of old socks. Slip them over your toes for extra wiggle room and pull your thin snowboard socks over them.
- Remove the rice socks and replace the footbeds before stepping into the boots. Step into the boots and loosely tighten the laces to avoid compressing the foam.
- Stand on a short 2×4 board with your feet shoulder‑width apart and bend your knees slightly. Lean forward gently to mimic a riding stance and flex your ankles for another ten minutes.
- Repeat the entire process on the other boot so both liners match. The process, from heating to cooling, should take about twenty minutes.
Tips
- Use equal amounts of rice in each sock to avoid uneven heating.
- Keep the boots loose during heating and molding to prevent over‑compression of the foam.
- Wear both boots during the process to maintain a natural stance and balance.
- If the liner still feels tight after cooling, you can repeat the process or consult a professional.
Cautions
- This method applies only to heat‑moldable liners that soften when heated. Heating non‑moldable liners will ruin the foam and shorten the boot’s life.
- Do not overheat the rice because overheated rice can damage the liner or cause burns.
- Handle the hot socks carefully and use oven mitts or a towel to avoid burns.
Professional Heat Molding (Commercial Boot Fitter)
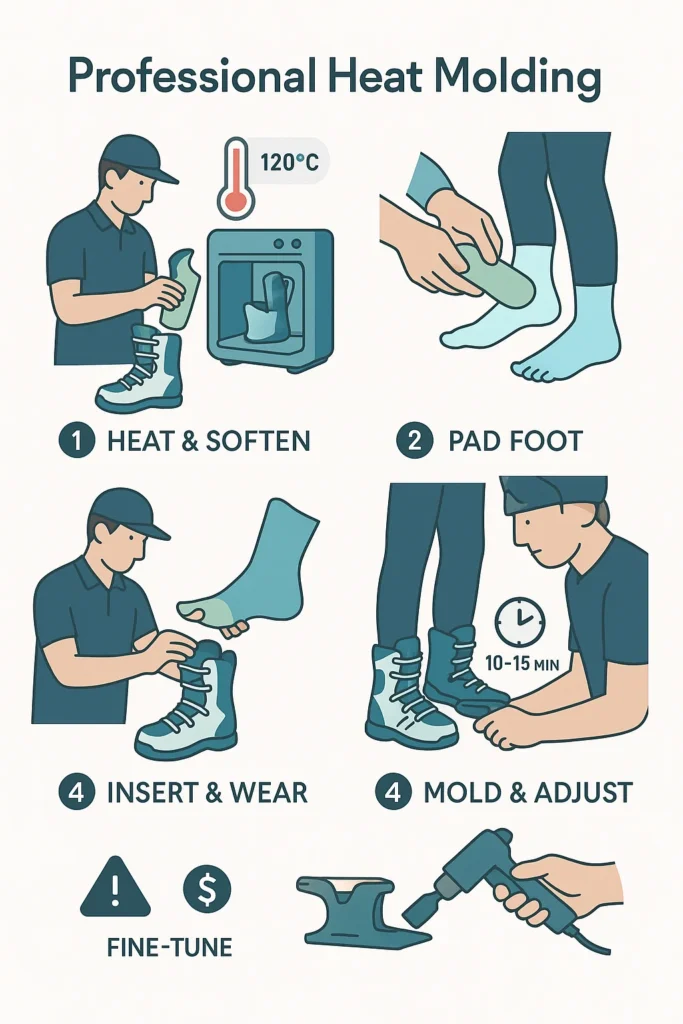
- Book an appointment with a qualified boot fitter. Bring your boots, footbeds, and thin socks.
- The fitter will remove the liners and heat them in a specialized oven or with a heat gun until they are pliable. The heat setting is usually around 120 °C and the warming time is about 4–12 minutes.
- While the liners warm up, the fitter pads your feet in key areas to protect pressure points. They may use toe caps, foam pads, or tape to create extra space where needed.
- Once heated, the fitter places the liners back into the boots and has you step into them immediately. You will wear thin socks and the footbeds.
- The fitter tightens the boots moderately and asks you to stand in your natural riding stance for about ten minutes. Flex your ankles and knees to help the foam conform to the shape of your feet.
- After the liners cool and set, the fitter removes any padding and checks the fit. They may make further adjustments by punching or grinding the shell or adding or removing liner padding.
- A typical liner heat‑molding session takes about fifteen minutes, and many shops charge around $30 for liner molding and $60 for shell molding. Some shops include this service with a boot purchase.
Tips
- Use a professional fitter if you have high arches, bunions, or any foot problems. They can pad and shape the liner to relieve pressure points.
- Wear the same socks you will use on the mountain for the most accurate fit.
- Consider custom footbeds during your visit; they improve alignment and support, especially when paired with a molded liner.
Cautions
- Do not try to replicate this oven method at home. Specialized ovens and heat guns provide controlled, even heat that prevents damage.
- Heating non‑moldable liners or using household ovens can ruin the foam and void the warranty.
- Follow the fitter’s instructions precisely. Overheating or tightening the boots too much during the process can compress the foam and reduce the benefit.
Comparing DIY and Professional Methods
Doing a basic heat mold at home can improve boot comfort, but a professional fitter offers a more precise fit and can resolve complex issues. The table below compares the two options.
| Aspect | DIY home method | Professional service |
|---|---|---|
| Equipment needed | Rice, tube socks, 2×4 board, old socks, microwave | Specialized boot oven or heat gun, padding materials, professional tools |
| Process | Heat rice in socks, insert into liners, then stand in a riding stance for about 20 minutes | Heat liners in an oven, pad your feet, then wear boots as fitter molds and adjusts them |
| Time | About 20 minutes total | Liner heat‑molding takes about 15 minutes; shell molding around 30 minutes |
| Cost | Minimal (only rice and socks) | Typically $30 for liner molding and $60 for shell molding |
| Fit quality | Relieves minor pressure points; may require repetition | Provides precise fit and relief for major issues; shell can be punched or ground |
| Best for | Riders with few pressure points or limited budget | Riders with unique foot shapes or high‑end boots needing expert adjustment |

Choose the method that matches your needs. Home molding works for small adjustments and saves money. A shop fit offers a custom feel and solves complex fit problems.
FAQ
Are all snowboard boots heat moldable?
Not every boot has heat‑moldable liners; check your model. Heating non‑moldable liners can ruin them.
How long does the heat molding process take?
The process typically takes 10 to 20 minutes, including heating and standing in a riding stance for about 15 minutes.
Do I need to heat mold new boots?
Not always. Self‑molding liners will conform after a few days of riding, and you can always heat mold later.
Can I heat mold my boots more than once?
Yes, you can reheat and reform liners if the fit isn’t right. Spot‑heating with a heat gun can fix specific pressure points.
Can I mold boots by riding instead of heating?
Some boots will mold naturally after three to five days of riding; wearing them around the house also helps.
Final Tips
How to heat mold snowboard boots and enjoy them afterwards? After molding, give the liners time to settle by riding for a few sessions. Even non‑moldable boots will conform after three to five days of riding.
Wear the boots around the house to speed up the break‑in. Keep socks smooth to avoid wrinkles or pressure points. Always check that your liners are heat‑moldable before heating. Use custom footbeds or insoles for better support and alignment. If the fit still feels off, you can reheat and reform the liners or seek a professional for adjustments.


